
Hello dear creative friends and happy February! 💖 Today I’m sharing a little floral creation, with a lovely vintage bride and groom as my centerpiece.

Let me show you a little of my making process for this one...
The Background...
I used a small Etcetera thickboard tag for my base, then cut some floral pieces from the Mixed Media #5 die set out of heavystock, fussy cut around the flowers and glued on my tag with collage medium.

Once the front was dry, I folded the paper over the edges where I could and glued the excess down on the sides and back. I also fussy cut a little circle piece of heavystock to fill in the hole at the top.
Next, I went over everything with a thick coat of Picket Fence distress paint. I then decided to add a layer of embossing to help soften my imperfect cuts a bit better… I applied clear embossing ink (I like to take off the dabber top and just dip my paint brush directly in) and sprinkled on clear embossing powder, then heat set with my embossing gun.

Not the best pics, but I’m hoping can you see how the embossing helps the fussy-cut edges blend with the surface of the tag and fuses everything together… won-der-ful ✨

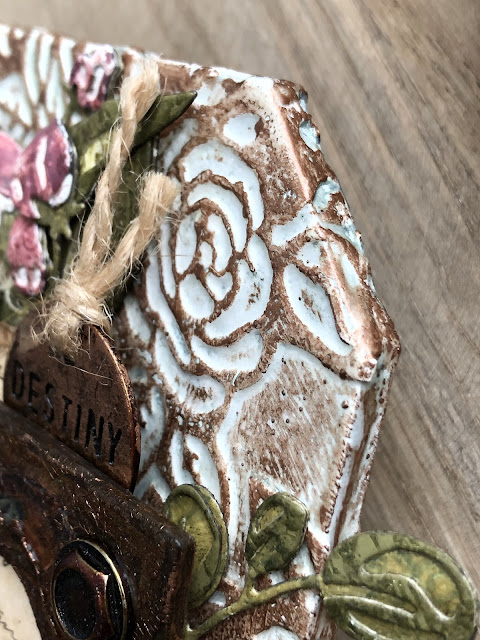
Next I used my finger to rub on some Sizzix Rose Gold wax to the raised texture (SO gratifying to see the design + texture really come alive in this step, my fave!). Then I gave it a good collage medium topcoat before setting aside to work on my layers (which will end up covering MOST of this background goodness 🤦🏻♀️ but still so fun)

Here’s a closer look at the background texture and edge on the finished piece…
The Crackly Frame...
This little frame is from the Ideaology Baseboard Frames set… (I was in the zone and forgot to take pics of my steps leading up to this grungy crackle 😑)

First, I covered it with a chunky layer of clear Rock Candy crackle (super thick = big cracks!) then once the crackle was dry, I painted with a splotchy combo of Walnut Stain and Ground Espresso distress paints before rubbing on some Rose Gold wax with my finger to help accentuate the texture.
I added Caramel alcohol ink to two machinery heads for the top corners.

The Flowers...
Next, I made some of my own papers from scrap pieces of heavystock with watery pinkish tones for my petals (Victorian Velvet + Aged Mahogany) and a couple greenish pieces for the leaves (Forest Moss).


A lot of different paints, embossing ink + glazes involved (and not much ‘thinking’ 🤪) , but the Renaissance stamps on top really make these pieces pop and I’m loving how they turned out (a small shame to chop them up, as they would make pretty backgrounds all on their own! 💡)

Once my papers were done, I cut some flowers + leaves using the Bloom Colorize set, assembled and glued, then used a vintage photo distress marker to color the edges.

The Lattice Pieces...
These 'lattice' pieces (as I call them 🤷🏻♀️) are from the Pattern Repeat die set. I cut several from white heavystock then coated them with clear embossing ink followed by white powder, then heat set.


Next, I painted them with ground espresso, and rubbed on some Rose Gold wax to give a little extra sheen and help them tie in with my background.

The Finishing Elements…
Here are some details about the other little bits I gathered that I thought fit my scene:

The Vintage couple is from the Paper Dolls Groups set -- loved them just as they were, no extra goop or grunge needed.

The handwritten piece just behind the frame is from the Ideaology Collector layers pack. I spotted the word “Mademoiselle” somewhere in the writing and tore it off separately to go next to my Destiny token just above my frame. Also tore off a little strip from the edge to go under my ruler near the bottom.

The Wooden Ruler is one of the Ideaology ruler pieces. I snapped one end for a rough look and coated with a wash of Vintage Photo stain.

The Destiny piece is an old school Ideaology word token. I rubbed on some Rose Gold wax with my finger, careful not to get any in the text grooves, then looped a piece of twine through the hole.
The Cheese cloth is sprayed with Antique Linen stain.
The Follow Your Heart quote chip is from the Ideaology Theories pack. I added a little antique linen stain to the edges, then glued a couple of Caramel-inked hardware heads to the ends.

The little postcard piece along the right side is also from the Collector layers set. I distressed the edges and grunged with vintage photo stain.
The Assembly...
I first glued some bits directly to my frame: the handwritten pieces, postcard, ruler, and Destiny token are underneath, the paper doll couple over the top.

Once this little assembly was dry, I glued some quote chips underneath to give it some extra lift so I could tuck in my lattice + floral pieces around the edges…

Next, I glued on the lattice…

Then my cheesecloth, leaves + flowers…

And finally the main quote chip…

Ta-da! I think the contrast of the muted couple with the brighter flowers around them is quite cute, I hope you agree!
Thanks so much for checking out my project ❤️
Happy crafting!
x Erin
The Products...
Surfaces... small Etcetera thickboard tag, white heavystock paper
Dies... Mixed Media #5, Pattern Repeat, Bloom Colorize
Mediums... Collage medium, embossing dabber, Versamark, Rose Gold wax
Alcohol ink… Caramel
Stamps… Renaissance (CMS415)
Distress Paint... Picket Fence, Victorian Velvet, Forest Moss, Ground Espresso, Walnut Stain, Aged Mahogany
Distress Stain… Vintage Photo
Distress Glaze… Tattered Rose
Tim Holtz Ideaology... machinery heads, Theories quote chips, paper dolls groups, hardware heads, ruler pieces, Collector layers pack, Destiny token
Other Tools + Supplies… glass mat, Big Shot, embossing gun, cheese cloth, twine