
Hello crafty friends! Today I’m sharing a holiday make featuring the lovely (classic) Dashing Deer Bigz die, set on a medium thickboard tag. He just seems so regal to me, I felt inspired to give him some beautiful trimmings ✨

Let’s dive in to how this piece came together, shall we?
The Background…
I first embossed 4 small pieces of heavystock with the Tim Holtz Arched 3D embossing folder (don’t forget to dampen the paper first and run through the Big Shot a few times to get a super deep imprint)…

Next, I cut sections from each piece and glued down on a medium-sized thick board tag with collage medium. (I cut along the arches, but as you can see in the next photo, imperfect seams are fine, they will all blend together nicely after the mediums are applied 👌🏻)

I trimmed off the excess paper with an exacto and added grit paste to the edges + a few random spots on the front. Once the grit was fully dry, I sealed everything with a layer of collage medium (leaving it a little thicker on the exposed seams), then coated with Picket Fence distress paint.
Here’s a little better view of the gritty edge at this point…

Next, I rubbed some Iced Spruce distress crayon on my glass mat and used a blending brush to really work it into the recessed areas of the design.
I used a baby wipe to wipe off the top-most crayon, leaving it only visible in the grooves. (My favorite step! I didn’t want my background to be too ‘busy’ knowing I would add plenty of detail over the top, so I’m loving how the iced spruce just subtly accentuates that yummy pattern/texture.)


The Dashing Deer…
I cut three pieces of the Dashing Deer Bigz die from 50-point chipboard, cut the antlers off of the top piece, and glued them all together to make him extra thick.

Now to texturize + paint him up!
For the head/body, I first covered generously with grit paste. Once the thick grit was fully dry, I coated with walnut stain distress paint. Then added some Vintage Photo paint highlights under his jaw + inner neck, and used my finger to rub on some Rose Gold luster wax to the raised ‘furry’ texture.

For his antlers, I used a piece of heavystock to create my own handmade cream-colored paper (Antique Linen paint base with white and gold embossing powder). Then I used the Bigz die to cut the antlers from this piece and glued it over the chipboard. I Painted the antler edges with Black Soot and added a bit more random gold embossing to help make it look more unified.

At this point, I Added a bit of Black Soot paint + a dab of Glossy Accents to the tip of his nose, then Bent and shaped him to add dimension. I also glued a hitch fastener on the underside, between the ears, to give him some extra lift.
For his collar, I first painted some Ideaology pieces with black soot: the chain of a swivel clasp (removed the actual clasp), a jump ring, and 2 tiny bells. Once the paint was dry, I added gold embossing to the bells.

(I was inspired by Tim to include several embossed metal Ideaology bits in this project. He gives a great tutorial of this technique in the 2021 holiday demo Part 4. My fave part starts at about 1:13:00 where he works on the little tree stand 😍)
The Gold Trim + Ruler Ledge…
I decided I needed a little ledge for him to sit on, along with some extra contrast for my sentiment.
I used the Arched embossing folder again on another small piece of heavystock, then used the embossing dauber over the whole piece, covered with Princess gold embossing powder, then set the powder with a heat gun. Next, I used the bracket die to cut two gold strips before gluing them on the thick board bracket trim pieces.
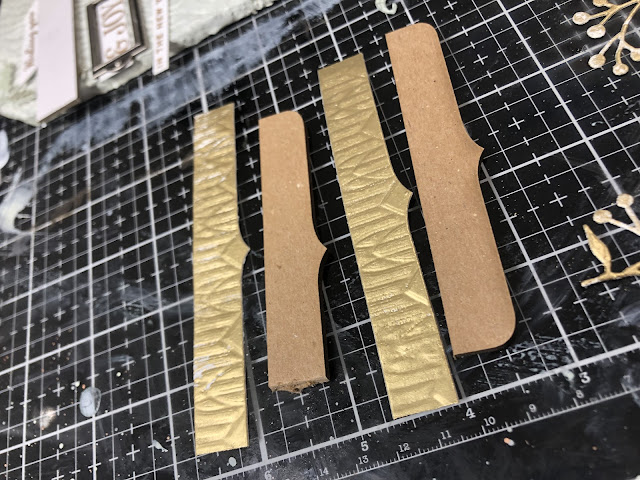

Once the paper was glued on my chipboard trim pieces, I trimmed any excess paper, then added more gold embossing powder to the edges and a little walnut stain Distress crayon over the top to highlight the texture.
The metal ruler is from the Ideaology Measurements set. It was already black, so I didn’t bother to paint it first, just added some gold embossing to the numbers and tick marks.
The Sentiment…
I was inspired by one of the phrases in the Festive Overlay stamp set but decided to do something different for each part of the phrase + use dies for PEACE.

I stamped “Wishing you” in clear embossing ink on my handmade cream paper, sprinkled on Ranger’s black embossing powder, then heat set and cut out the little strip by hand. I painted a memo pin with Black Soot to hold it in place.
I also stamped “In The New Year” on my creamy paper with clear emboss ink, sprinkled on Princess Gold and heat set, then cut around each by hand. I added some Black Soot Distress crayon to the edges. I painted an Ideaology Wire pin with Black Soot and poked it through each strip to hold them in place.
For the PEACE letters, I used the Alphanumeric Bold die set and cut three of each from heavystock + one of each from my cream paper, then glued all 4 together for a thick stack, then painted the edges of each letter with black Soot. I placed the letters on my gold trim piece, added a hardware head at one end, and a gold-embossed large hinge clip on the other side.
Joy + Frame… I stamped “& JOY” in clear embossing ink on heat-resistant clear acetate, then sprinkled on black embossing powder and heat set. The little frame is from the Ideaology Label Frames set. I painted it with Black Soot, then once dry, I added some random gold embossing, before placing the clear acetate piece behind it. Loving how this turned out✨
The Greenery…
For my Foliage, I created a few more handmade papers with green base tones (Iced Spruce, Bundled Sage, Rustic Wilderness), stamps from The Poinsettia set, and gold and white embossed accents, then used the Greens Mini dies to cut out my pieces. I also cut a few sprigs out of clear acetate, then added gold embossing to the edges.


The Finishing Touches…
I tore off a few pieces from the Joy to the World sheet music in the Christmas layers pack.
I cut a few candles from the Candlelight Colorize set, added some gold embossed details and cut the flame from clear acetate, with a dab of Glossy Accents over the top. Once they were assembled and the glossy accents was dry, I used my finger to add Black Soot crayon to the edges


The December pin in the lower right corner is from the Christmas Vintage Flair set. I added a little gold embossing to the edges.
The snowflakes are from the Ideaology Clear Icicles and Snowflakes set (now discontinued, I believe, but the metal ones would be great, too). I added some Princess Gold embossing to the edges to help them fit my theme.

And that is my Dashing Deer tag! I had such fun making him and definitely scratched my embossing itch for a while 😂
Thanks for looking!
x Erin

The Products…
Dies… Dashing Deer Bigz (discontinued), Alphanumeric Bold, Greens mini, Candlelight Colorize, Decorative Trims
3D Embossing folder… Arched
Mediums… Distress Collage Medium, Grit Paste, Sizzix Rose Gold Luster Wax, Glossy Accents, Distress embossing ink, Distress embossing dabber
Distress Crayons… Iced Spruce, Black Soot
Distress Paint… Black Soot, Picket Fence, Bundled Sage
Embossing Powder… Princess Gold, Black, Clear, White
Ideaology… metal ruler, hitch fasteners, jump rings, tiny bells, Swivel Clasps, Large Hinge Clip, Label Frames, Wire pin, Memo Pin, hardware heads, Christmas layers, Frozen Clear Icicle Borders and Snowflakes (discontinued), Vintage Flair Christmas (discontinued)
Surfaces… Etcetera Medium tag thickboard, bracket trim chipboard, heat-resistant clear acetate, Distress White heavystock , 50-point chipboard sheets
Tools… glass mat, Big Shot, Exacto, heat gun, Distress sprayer, blending brush
I LOVE this! One of the prettiest tags I've ever seen. Love all the techniques and how beautiful they turned out.
ReplyDeleteWhat a sweet note, thank you Nancy! I SO appreciate your support! ❤️
Delete