
Hello, and thanks for stopping by! I hope life is treating you and yours well these wintery days. ❄️ I didn't have a ton of crafty time before the holidays, but it's calmed slightly in the few weeks after so I've been able to get back to some lingering seasonal makes!
Let me show you my latest creation — a gritty little Christmas scene, featuring Santa’s sleigh from the Dash Away All die set and plenty of other Tim Holtz goodies...


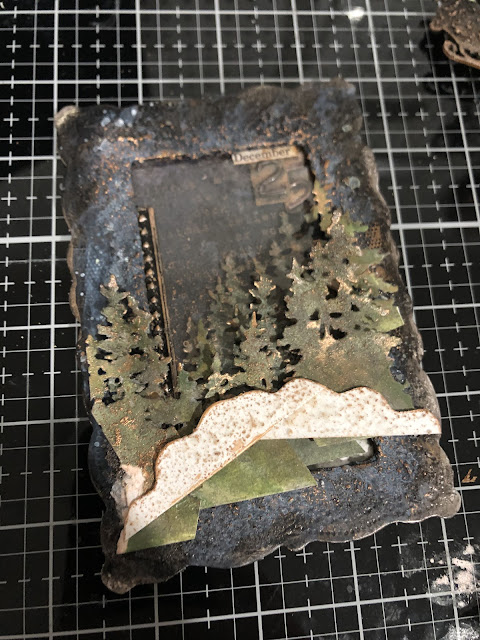
Here are some details about how this project came together…
The Background + Frames…
I started with two lace baseboard frames (obsessed with these!) + a little scrap of white heavystock paper for the background, and applied generous grit paste to all. Once my grit was dry, I painted my frames + background piece with a combo of Chipped Sapphire and Black Soot, just splotched on pretty randomly.

Just to the frames, I also added some Picket Fence splatters to give them a ‘snowy’ feel (this actually ended up being very subtle when it dried, which I’m loving, and made them a slightly lighter shade than the background paper). I then rubbed Antiqued Bronze stain over the gritty texture of the frames with my finger.

I used a small scrap piece of clear acetate, stamped it with Holiday Type (CMS281) using Antiqued Bronze stain, and placed over the top of my background piece just to add a little extra interest.


I also added two eyelets, painted with Antiqued Bronze, to the top corners of my larger frame to make it into a hanger. I set them with my Crop-a-dile tool and added a copper wire piece from my stash.


The Trees...
Next, I cut some trees from white heavystock using the Treeline die. I painted them using a blend of Forest Moss, Rustic Wilderness, and Iced Spruce distress paint with a bit of water, trying to keep the front layers a little lighter, and darker trees in back.

After my trees were dry, I ended up chopping them up into smaller tree clusters or individual trees, then added a small amount of grit paste to each piece. Once the grit was dry, I used my finger to rub on some Antiqued Bronze stain to the raised texture.

The Santa + Ledge…
I wanted my Santa silhouette and my bracket trim ledge to have a similar look to help balance out my scene. I first cut three of the Santa silhouette pieces from white heavystock, then glued together to get an extra thick piece. Then I added a good amount of grit paste to Santa and the trim piece.
Once dry, I painted them both with Black Soot and then added Antiqued bronze stain over the top of the texture with my finger, adding a bit more to the bottom of his sleigh and reindeer feet.

Finished my ledge with two hardware heads on each side.

The Houses…
Next, I worked on some little houses from the Snowglobe #2 Thinlits set.
Once my houses were cut from white heavystock and assembled together, I painted them with Black Soot, sealed with a chunky topcoat of Collage a medium, then rubbed on Antiqued Bronze with my finger. (This may look like it was time-consuming, but it was actually SO easy and I love how the antique bronze highlights the window frames and little details of the houses! 💥)

The Snow + Layered Moon…
I wanted my snow and moon pieces to all have the same look. I cut a handful of snow pieces from the Snowglobe #2 dies and a few Stitched Circles from white heavystock.
Then I applied grit paste to all (some on the ‘back side’ of my snow to give a little more variety). Once the grit was dry, I coated my pieces with Picket Fence paint, followed by Antiqued Bronze stain rubbed on the raised texture and edges.

The Merry Christmas Words…
I cut three sets of the words Merry Christmas from the Home for the Holidays Thinlit set, glued two of them together for a thicker piece, and left one set for my ‘shadow’ layer.
For my shadow set, I just painted thoroughly with Antiqued Bronze. For my thicker words, I added grit paste and let it dry. Then painted with Picket Fence, rubbed on Antiqued Bronze stain, and glued slightly offset over my shadow layer.

The Finishing Touches…
As always, I added some odds and ends in the final stages…
A couple clippings from the Christmas sticker book, with Antiqued Bronze stain applied to the rough edges.

The numbers 2 and 5 are from the Ideaology Type Chips pack.

Cheese cloth is a staple in my craft room! I applied a bit of Antiqued Bronze stain to a few bits and used it to fill in some snow patches and around my moon layers.

I cut a few smaller strips from the Star Trim 3D embossing folder to add some extra interest around my frames, painted with Black Soot, then added antiqued bronze stain highlights.

The metal ruler is from the Ideaology Measurements pack. I rubbed Antiqued Bronze stain on the raised texture. (What is it with me and rulers lately!? They just always seem like the perfect addition 😂)

Once all of my pieces were assembled and jazzed up, it was just a matter of gluing all my layers together…


And that’s it for this fun little make!
I hope you like it and get a chance to have some crafty time of your own soon!
Thanks for looking ❤️
x Erin
The Products…
Sizzix + Tim Holtz Dies… Dash Away All, Stitched Circles, Treeline, Snowglobe #2, Home for the Holidays
Sizzix + Tim Holtz 3D Embossing Folder… Star Trim
Surfaces… white heavystock, lace baseboard frames, bracket trim chipboard, heat-resistant clear acetate
Stampers Anonymous + Tim Holtz Stamps… Holiday Type (CMS281)
Ranger + Tim Holtz Distress Mediums… collage Medium, grit paste
Ranger + Tim Holtz Distress Stain… Antiqued Bronze
Ranger + Tim Holtz Distress Paint… Black Soot, Chipped Sapphire, Forest Moss, Rustic Wilderness, Iced Spruce, Picket Fence
Other Tools… Big Shot, glass mat, distress sprayer, eyelets, crop-a-dile, copper wire, cheese cloth
No comments:
Post a Comment