Tuesday, February 1, 2022

Follow Your Heart Tag

Hello dear creative friends and happy February! 💖 Today I’m sharing a little floral creation, with a lovely vintage bride and groom as my centerpiece.


Let me show you a little of my making process for this one...

The Background...


I used a small Etcetera thickboard tag for my base, then cut some floral pieces from the Mixed Media #5 die set out of heavystock, fussy cut around the flowers and glued on my tag with collage medium.


Once the front was dry,  I folded the paper over the edges where I could and glued the excess down on the sides and back. I also fussy cut a little circle piece of heavystock to fill in the hole at the top.


Next, I went over everything with a thick coat of Picket Fence distress paint. I then decided to add a layer of embossing to help soften my imperfect cuts a bit better… I applied clear embossing ink (I like to take off the dabber top and just dip my paint brush directly in) and sprinkled on clear embossing powder, then heat set with my embossing gun.


Not the best pics, but I’m hoping can you see how the embossing helps the fussy-cut edges blend with the surface of the tag and fuses everything together… won-der-ful ✨


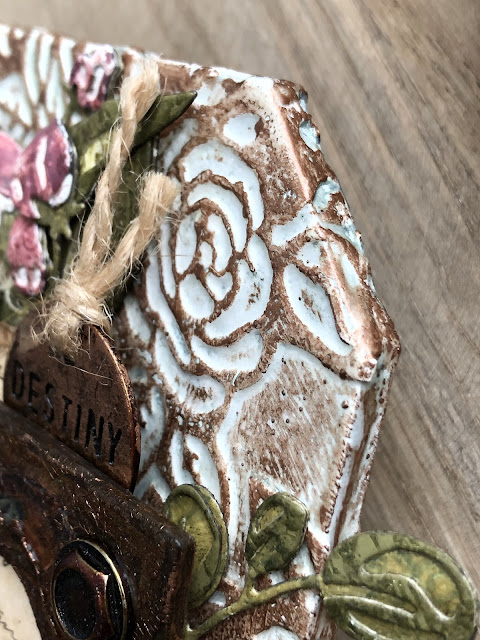
Next I used my finger to rub on some Sizzix Rose Gold wax to the raised texture (SO gratifying to see the design + texture really come alive in this step, my fave!). Then I gave it a good collage medium topcoat before setting aside to work on my layers (which will end up covering MOST of this background goodness ðŸĪĶðŸŧ‍♀️ but still so fun)


Here’s a closer look at the background texture and edge on the finished piece…


The Crackly Frame...


This little frame is from the Ideaology Baseboard Frames set… (I was in the zone and forgot to take pics of my steps leading up to this grungy crackle 😑)


First, I covered it with a chunky layer of clear Rock Candy crackle (super thick = big cracks!) then once the crackle was dry, I painted with a splotchy combo of Walnut Stain and Ground Espresso distress paints before rubbing on some Rose Gold wax with my finger to help accentuate the texture.

I added Caramel alcohol ink to two machinery heads for the top corners.


The Flowers...


Next, I made some of my own papers from scrap pieces of heavystock with watery pinkish tones for my petals (Victorian Velvet + Aged Mahogany) and a couple greenish pieces for the leaves (Forest Moss).


A lot of different paints, embossing ink + glazes involved (and not much ‘thinking’ ðŸĪŠ) , but the Renaissance stamps on top really make these pieces pop and I’m loving how they turned out (a small shame to chop them up, as they would make pretty backgrounds all on their own! ðŸ’Ą)


Once my papers were done, I cut some flowers + leaves using the Bloom Colorize set, assembled and glued, then used a vintage photo distress marker to color the edges.


The Lattice Pieces...


These 'lattice' pieces (as I call them ðŸĪ·ðŸŧ‍♀️) are from the Pattern Repeat die set. I cut several from white heavystock then coated them with clear embossing ink followed by white powder, then heat set.


Next, I painted them with ground espresso, and rubbed on some Rose Gold wax to give a little extra sheen and help them tie in with my background.


The Finishing Elements…


Here are some details about the other little bits I gathered that I thought fit my scene:


The Vintage couple is from the Paper Dolls Groups set -- loved them just as they were, no extra goop or grunge needed.


The handwritten piece just behind the frame is from the Ideaology Collector layers pack. I spotted the word “Mademoiselle” somewhere in the writing and tore it off separately to go next to my Destiny token just above my frame. Also tore off a little strip from the edge to go under my ruler near the bottom.


The Wooden Ruler is one of the Ideaology ruler pieces. I snapped one end for a rough look and coated with a wash of Vintage Photo stain.


The Destiny piece is an old school Ideaology word token. I rubbed on some Rose Gold wax with my finger, careful not to get any in the text grooves, then looped a piece of twine through the hole.

The Cheese cloth is sprayed with Antique Linen stain.

The Follow Your Heart quote chip is from the Ideaology Theories pack. I added a little antique linen stain to the edges, then glued a couple of Caramel-inked hardware heads to the ends.


The little postcard piece along the right side is also from the Collector layers set. I distressed the edges and grunged with vintage photo stain.

The Assembly...


I first glued some bits directly to my frame: the handwritten pieces, postcard, ruler, and Destiny token are underneath, the paper doll couple over the top.


Once this little assembly was dry, I glued some quote chips underneath to give it some extra lift so I could tuck in my lattice + floral pieces around the edges…


Next, I glued on the lattice…


Then my cheesecloth, leaves + flowers…


And finally the main quote chip…


Ta-da! I think the contrast of the muted couple with the brighter flowers around them is quite cute, I hope you agree!

Thanks so much for checking out my project ❤️
Happy crafting!
x Erin


The Products...


Alcohol ink… Caramel

Distress Stain… Vintage Photo

Distress Glaze… Tattered Rose

Embossing Powder... clear, white

Other Tools + Supplies… glass mat, Big Shot, embossing gun, cheese cloth, twine

Thursday, January 20, 2022

Santa’s Sleigh Framed Hanger

Hello, and thanks for stopping by! I hope life is treating you and yours well these wintery days. ❄️ I didn't have a ton of crafty time before the holidays, but it's calmed slightly in the few weeks after so I've been able to get back to some lingering seasonal makes!

Let me show you my latest creation — a gritty little Christmas scene, featuring Santa’s sleigh from the Dash Away All die set and plenty of other Tim Holtz goodies...


Here are some details about how this project came together…


The Background + Frames…


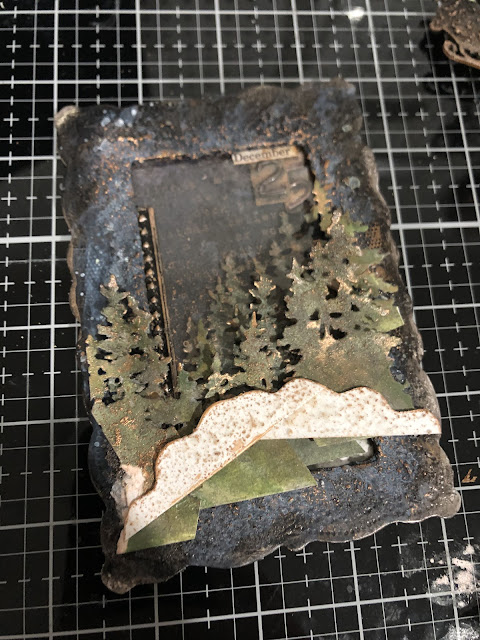
I started with two lace baseboard frames (obsessed with these!) + a little scrap of white heavystock paper for the background, and applied generous grit paste to all. Once my grit was dry, I painted my frames + background piece with a combo of Chipped Sapphire and Black Soot, just splotched on pretty randomly.


Just to the frames, I also added some Picket Fence splatters to give them a ‘snowy’ feel (this actually ended up being very subtle when it dried, which I’m loving, and made them a slightly lighter shade than the background paper). I then rubbed Antiqued Bronze stain over the gritty texture of the frames with my finger.


I used a small scrap piece of clear acetate, stamped it with Holiday Type (CMS281) using Antiqued Bronze stain, and placed over the top of my background piece just to add a little extra interest.


I also added two eyelets, painted with Antiqued Bronze, to the top corners of my larger frame to make it into a hanger. I set them with my Crop-a-dile tool and added a copper wire piece from my stash.


The Trees...


Next, I cut some trees from white heavystock using the Treeline die. I painted them using a blend of Forest Moss, Rustic Wilderness, and Iced Spruce distress paint with a bit of water, trying to keep the front layers a little lighter, and darker trees in back. 


After my trees were dry, I ended up chopping them up into smaller tree clusters or individual trees, then added a small amount of grit paste to each piece. Once the grit was dry, I used my finger to rub on some Antiqued Bronze stain to the raised texture. 


The Santa + Ledge…

 
I wanted my Santa silhouette and my bracket trim ledge to have a similar look to help balance out my scene. I first cut three of the Santa silhouette pieces from white heavystock, then glued together to get an extra thick piece. Then I added a good amount of grit paste to Santa and the trim piece. 

Once dry, I painted them both with Black Soot and then added Antiqued bronze stain over the top of the texture with my finger, adding a bit more to the bottom of his sleigh and reindeer feet. 


Finished my ledge with two hardware heads on each side.


The Houses…


Next, I worked on some little houses from the Snowglobe #2 Thinlits set.

Once my houses were cut from white heavystock and assembled together, I painted them with Black Soot, sealed with a chunky topcoat of Collage a medium, then rubbed on Antiqued Bronze with my finger. (This may look like it was time-consuming, but it was actually SO easy and I love how the antique bronze highlights the window frames and little details of the houses! ðŸ’Ĩ)


The Snow + Layered Moon…


I wanted my snow and moon pieces to all have the same look. I cut a handful of snow pieces from the Snowglobe #2 dies and a few Stitched Circles from white heavystock. 

Then I applied grit paste to all (some on the ‘back side’ of my snow to give a little more variety). Once the grit was dry, I coated my pieces with Picket Fence paint, followed by Antiqued Bronze stain rubbed on the raised texture and edges.


The Merry Christmas Words…


I cut three sets of the words Merry Christmas from the Home for the Holidays Thinlit set, glued two of them together for a thicker piece, and left one set for my ‘shadow’ layer.

For my shadow set, I just painted thoroughly with Antiqued Bronze. For my thicker words, I added grit paste and let it dry. Then painted with Picket Fence, rubbed on Antiqued Bronze stain, and glued slightly offset over my shadow layer.


The Finishing Touches…


As always, I added some odds and ends in the final stages…

A couple clippings from the Christmas sticker book, with Antiqued Bronze stain applied to the rough edges.


The numbers 2 and 5 are from the Ideaology Type Chips pack.


Cheese cloth is a staple in my craft room! I applied a bit of Antiqued Bronze stain to a few bits and used it to fill in some snow patches and around my moon layers.


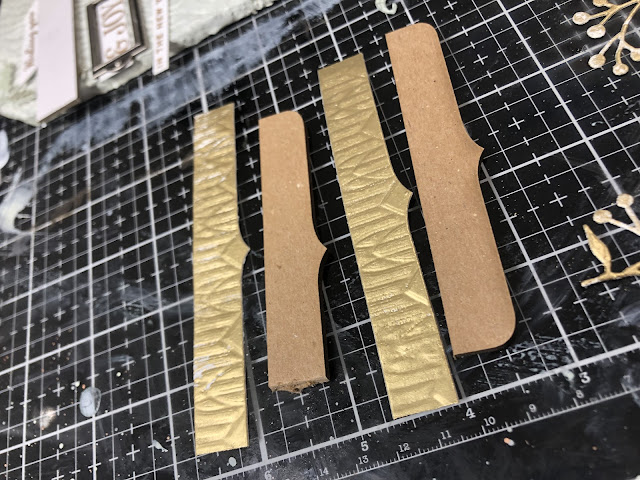
I cut a few smaller strips from the Star Trim 3D embossing folder to add some extra interest around my frames, painted with Black Soot, then added antiqued bronze stain highlights.


The metal ruler is from the Ideaology Measurements pack. I rubbed Antiqued Bronze stain on the raised texture. (What is it with me and rulers lately!? They just always seem like the perfect addition 😂)


Once all of my pieces were assembled and jazzed up, it was just a matter of gluing all my layers together… 


And that’s it for this fun little make!
I hope you like it and get a chance to have some crafty time of your own soon!
Thanks for looking ❤️
x Erin


The Products…


Sizzix + Tim Holtz Dies… Dash Away All, Stitched Circles, Treeline, Snowglobe #2, Home for the Holidays

Sizzix + Tim Holtz 3D Embossing Folder… Star Trim


Stampers Anonymous + Tim Holtz Stamps… Holiday Type (CMS281)

Ranger + Tim Holtz Distress Mediums… collage Medium, grit paste

Ranger + Tim Holtz Distress Stain… Antiqued Bronze

Ranger + Tim Holtz Distress Paint… Black Soot, Chipped Sapphire, Forest Moss, Rustic Wilderness, Iced Spruce, Picket Fence

Ideaology… Type Chips, Christmas sticker book, Measurements, hardware heads

Other Tools… Big Shot, glass mat, distress sprayer, eyelets, crop-a-dile, copper wire, cheese cloth

Wednesday, January 12, 2022

Dashing Deer Thickboard Tag

Hello crafty friends! Today I’m sharing a holiday make featuring the lovely (classic) Dashing Deer Bigz die, set on a medium thickboard tag. He just seems so regal to me, I felt inspired to give him some beautiful trimmings ✨


Let’s dive in to how this piece came together, shall we?


The Background…


I first embossed 4 small pieces of heavystock with the Tim Holtz Arched 3D embossing folder (don’t forget to dampen the paper first and run through the Big Shot a few times to get a super deep imprint)…


Next, I cut sections from each piece and glued down on a medium-sized thick board tag with collage medium. (I cut along the arches, but as you can see in the next photo, imperfect seams are fine, they will all blend together nicely after the mediums are applied 👌ðŸŧ)


I trimmed off the excess paper with an exacto and added grit paste to the edges + a few random spots on the front. Once the grit was fully dry, I sealed everything with a layer of collage medium (leaving it a little thicker on the exposed seams), then coated with Picket Fence distress paint. 

Here’s a little better view of the gritty edge at this point…


Next, I rubbed some Iced Spruce distress crayon on my glass mat and used a blending brush to really work it into the recessed areas of the design.

I used a baby wipe to wipe off the top-most crayon, leaving it only visible in the grooves. (My favorite step! I didn’t want my background to be too ‘busy’ knowing I would add plenty of detail over the top, so I’m loving how the iced spruce just subtly accentuates that yummy pattern/texture.)


The Dashing Deer…


I cut three pieces of the Dashing Deer Bigz die from 50-point chipboard, cut the antlers off of the top piece, and glued them all together to make him extra thick.


Now to texturize + paint him up!

For the head/body, I first covered generously with grit paste. Once the thick grit was fully dry, I coated with walnut stain distress paint. Then added some Vintage Photo paint highlights under his jaw + inner neck, and used my finger to rub on some Rose Gold luster wax to the raised ‘furry’ texture.


For his antlers, I used a piece of heavystock to create my own handmade cream-colored paper (Antique Linen paint base with white and gold embossing powder). Then I used the Bigz die to cut the antlers from this piece and glued it over the chipboard. I Painted the antler edges with Black Soot and added a bit more random gold embossing to help make it look more unified.


At this point, I Added a bit of Black Soot paint + a dab of Glossy Accents to the tip of his nose, then Bent and shaped him to add dimension. I also glued a hitch fastener on the underside, between the ears, to give him some extra lift.

For his collar, I first painted some Ideaology pieces with black soot: the chain of a swivel clasp (removed the actual clasp), a jump ring, and 2 tiny bells. Once the paint was dry, I added gold embossing to the bells.


(I was inspired by Tim to include several embossed metal Ideaology bits in this project. He gives a great tutorial of this technique in the 2021 holiday demo Part 4. My fave part starts at about 1:13:00 where he works on the little tree stand 😍)

The Gold Trim + Ruler Ledge…


I decided I needed a little ledge for him to sit on, along with some extra contrast for my sentiment.

I used the Arched embossing folder again on another small piece of heavystock, then used the embossing dauber over the whole piece, covered with Princess gold embossing powder, then set the powder with a heat gun. Next, I used the bracket die to cut two gold strips before gluing them on the thick board bracket trim pieces.


Once the paper was glued on my chipboard trim pieces, I trimmed any excess paper, then added more gold embossing powder to the edges and a little walnut stain Distress crayon over the top to highlight the texture.

The metal ruler is from the Ideaology Measurements set. It was already black, so I didn’t bother to paint it first, just added some gold embossing to the numbers and tick marks. 

The Sentiment…


I was inspired by one of the phrases in the Festive Overlay stamp set but decided to do something different for each part of the phrase + use dies for PEACE.


I stamped “Wishing you” in clear embossing ink on my handmade cream paper, sprinkled on Ranger’s black embossing powder, then heat set and cut out the little strip by hand. I painted a memo pin with Black Soot to hold it in place.

I also stamped “In The New Year” on my creamy paper with clear emboss ink, sprinkled on Princess Gold and heat set, then cut around each by hand. I added some Black Soot Distress crayon to the edges. I painted an Ideaology Wire pin with Black Soot and poked it through each strip to hold them in place.

 For the PEACE letters, I used the Alphanumeric Bold die set and cut three of each from heavystock + one of each from my cream paper, then glued all 4 together for a thick stack, then painted the edges of each letter with black Soot. I placed the letters on my gold trim piece, added a hardware head at one end, and a gold-embossed large hinge clip on the other side.

Joy + Frame… I stamped “& JOY” in clear embossing ink on heat-resistant clear acetate, then sprinkled on black embossing powder and heat set. The little frame is from the Ideaology Label Frames set. I painted it with Black Soot, then once dry, I added some random gold embossing, before placing the clear acetate piece behind it. Loving how this turned out✨


The Greenery…


For my Foliage, I created a few more handmade papers with green base tones (Iced Spruce, Bundled Sage, Rustic Wilderness), stamps from The Poinsettia set, and gold and white embossed accents, then used the Greens Mini dies to cut out my pieces. I also cut a few sprigs out of clear acetate, then added gold embossing to the edges.


The Finishing Touches…


I tore off a few pieces from the Joy to the World sheet music in the Christmas layers pack. 

I cut a few candles from the Candlelight Colorize set, added some gold embossed details and cut the flame from clear acetate, with a dab of Glossy Accents over the top. Once they were assembled and the glossy accents was dry, I used my finger to add Black Soot crayon to the edges


The December pin in the lower right corner is from the Christmas Vintage Flair set. I added a little gold embossing to the edges.

The snowflakes are from the Ideaology Clear Icicles and Snowflakes set (now discontinued, I believe, but the metal ones would be great, too). I added some Princess Gold embossing to the edges to help them fit my theme.


And that is my Dashing Deer tag! I had such fun making him and definitely scratched my embossing itch for a while 😂

Thanks for looking!
x Erin


The Products…


Dies… Dashing Deer Bigz (discontinued), Alphanumeric Bold, Greens mini, Candlelight Colorize, Decorative Trims

3D Embossing folder… Arched


Distress Crayons… Iced Spruce, Black Soot


Embossing Powder… Princess Gold, Black, Clear, White

Ideaology… metal ruler, hitch fasteners, jump rings, tiny bells, Swivel ClaspsLarge Hinge Clip, Label Frames, Wire pin, Memo Pin, hardware heads, Christmas layers, Frozen Clear Icicle Borders and Snowflakes (discontinued), Vintage Flair Christmas (discontinued)


Tools… glass mat, Big Shot, Exacto, heat gun, Distress sprayer, blending brush